Understand pixels
This second beginners tip I have for you comes from having to explain this issue quite frequently to my clients. Often I would get materials in the form of logos and photos that just aren't suited to the work they need me to do & it's my job to explain they need my help to get something better otherwise their project would just turn out all hamajang (for the benefit of those not in Hawaii, that means, "screwed up")
Tip #2: Know how your computer understands graphics.
There it is again, this crazy thing we call a COM-PU-TUR is actually quite stupid. It's only as smart as what some genious programmers or mathematicians have told it to do. What may seem like an easy process for us to grasp, is a huge affair for a computer to understand and that's why you and I pay the big bucks to get these programs like Photoshop or Illustrator to tell it what to do.
When you look at a photograph or image on your computer screen for instance, you see the subjects IN the photo. You see that zit on your face in your prom picture, you see your family gathered around some food, you see naked pictures of Angelina Jolie (yeah right you wish)
Your dumb computer doesn't see it that way.
When your computer looks at a photograph or image it doesn't see your pretty face, your impressive trip photos, or your lost loved ones. It only sees it one of TWO ways, either as dots (pixels) or as lines (vectors).
Let me explain the DOTS this time around and let's save the line stuff for next time or else I'll be here all day. In the most basic sense, every image you're looking at on your screen right now is composed of thousands of adjacent colored dots sitting next to each other to form something that you recognize.
Take a look at this butterfly image for instance:
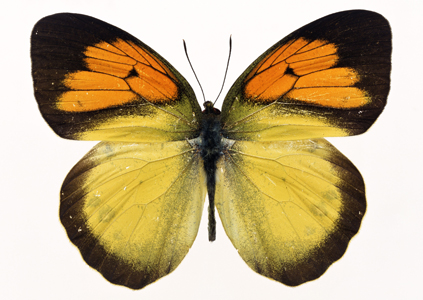 Pretty huh? It's probably dead. But that's ok. For the purpose of this tip, it's a beautiful image of a colorful butterfly. AAAAH. It looks like a reasonably sharp image, nothing that seems out of place.
Now when you zoom up to this photo, you can see how it's made:
 Can you see those little blocks of color? That represents the PIXELS, that sit next to each other to form that butterfly image. For instance, your computer's programming and software tells it that shades of grey blocks have to sit in between the black and white blocks in order for it to look good in the original image.
When you've printed something on a piece of paper it's the same way, except that they would say it's not "pixels" on your screen anymore, but little tiny ink dots on your page. Whatever, the basic idea is the same...
Remember this first concept, the MORE pixels on your page, or the MORE dots on your print, the better. That's because your computer now has more colored blocks to work with to form your images. i.e., It can use MORE shades of grey now. So your images may look smoother or have more detail.
But WAIT! There's more... what about when you reduce or enlarge your images?
Depending on how big your graphic is, there's a limit to how many pixels your screen image can display, or how many little tiny ink droplets your printer can spray on your photo paper. It's probably easiest to explain if I show you this example.
Say you were bored out of your mind one day and you decided to fill a page blue using nothing but tiny blue dots:
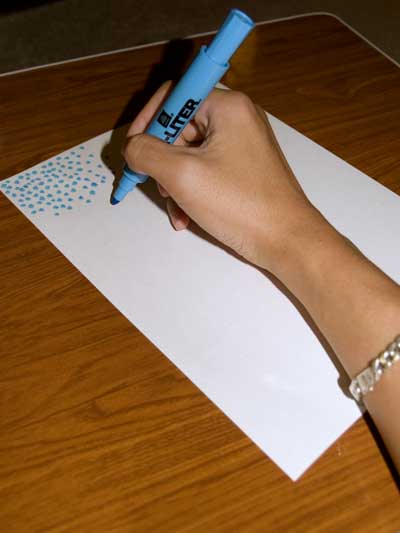 Besides the fact you need to find a hobby, you'd be drawing out hundreds, if not thousands of dots, to completely fill out this 8.5" x 11" piece of paper right?
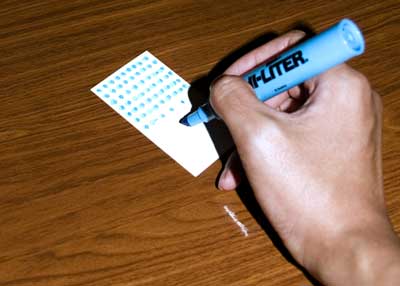 Now say you have a small piece of paper. You need to draw far less dots to completely cover this with blue right? Even if you wanted to draw out just as many dots on this tiny piece of paper as you did in the letter-sized page you'd probably have a hard time doing it, because there's just not enough space to do it. So you just forget about it, draw a few thousand less dots and be done with it.
This is basically what a computer does. When you reduce the size of your image it has to get rid of all the extra pixels or dots. So your computer makes decisions on which colors are best to keep in your photograph to make it look good, and then dumps the rest. More intelligent programs, or more expensive professional cameras help your computer make better choices on what to keep...but most of the time, the average untrained person couldn't tell the difference.
That's why you'll sometimes hear advice when you buy a digital camera for your 4" x 6" family photos, that there shouldn't be a noticeable practical difference between that $150 3megapixel camera, and that $3000 12megapixel camera... because your photo print is going to end up being the same number of dots per inch anyway.
Now when you ENLARGE an image, that's where you run into problems. Now instead of dumping away pixels or dots, it has to create new ones that weren't there to begin with. So it's going to use all these complex calculations to essentially guess at what's the best color to put in between the edges of your lime green logo and its pink background. It's in this circumstance that the computer often has to rely upon the person sitting behind the computer to make the right judgment calls, and even THEN, your graphic designer can only do so much. At some point you'll end up with blurry images, or images that look pixelated just like the zoomed up dead butterfly.
So the 2nd concept to keep in mind is that its easier for you to reduce your graphics rather then enlarge them. Whether you're working on your own projects or you're enlisting the help of a designer, always work with the biggest and best quality image first, and then scale it down to what you need.
Got it? Please don't ask me to take a tiny logo scanned from a business card and scale that up to a wall mural ok? I'll go crazy and start drawing blue dots full time.
posted by Raphael @ 1:47 PM
0 comments
![]()
![]()


0 Comments:
Post a Comment
<< Home